Swift tips #3: Flaky unit tests

If you’re a responsible engineer and don’t want every new PR to break your project, you start looking for solutions. You run checks every time before merging into main. Everything works, only working code in main, life is perfect…
But then you notice something. Some tests start failing for no reason. Locally — fine. On your favorite CI/CD — fail. Rerun — fine again.
At first, it seams like not a big deal. But your codebase grows, tests take 20–30 minutes to run, and flaky failures keep happening. Soon you’re spending 1–3 hours just to merge a damn good PR you need to merge today and it’s evening and you have plans. Sound familiar? Don’t worry, here’s how to fix it for most of the cases. And it’s simple.
Case #1: Don’t wait — await!
Suppose you have a class that does something and returns the result via a completion handler. For example, multiply a number by ten:
class Dummy {

    private let value: Int

    init(value: Int) {
        self.value = value
    }

    func calculation(completion: @escaping (Int) -> Void) {
        DispatchQueue.main.async { [weak self] in
            guard let value = self?.value else {
                return
            }

            completion(value * 10)
        }
    }
}
A test for it might look like this:
// XCTest version
final class DummyTests: XCTestCase {

    var sut: Dummy?

    func testShouldMultiplyByTen() {
        let expectedResult = 100
        let dummy = Dummy(value: 10)
        sut = dummy

        let expectation = XCTestExpectation(description: #function)

        var actualResult: Int = 0

        dummy.calculation { result in
            actualResult = result
            expectation.fulfill()
        }

        wait(for: [expectation], timeout: 0.1)

        XCTAssertEqual(actualResult, expectedResult)
    }
}
XCTest, the old good friend, seems solid, and everything should work fine. The Dummy doesn’t even have a state to worry about. But this guy will stab you in the back exactly when you least expect it — just like 🔪🥗. And here comes Brutus!
wait(for: [expectation], timeout: 0.1) This line makes your test wait until your unit is done, right? Wrong! This line waits for a specific amount of time that you provide in the timeout argument. But how can you guarantee that it’s enough? The code in Dummy is pretty simple and should execute almost instantly, but when your CPU is loaded with other tasks, it can take longer than you expect, and sometimes even this simple operation can time out.
The solution: Swift Testing can await
Replace you test with the a proper modern one:
// Swift Testing version

import Testing
@testable import YourApp

@Suite
struct DummyTests {

    @Test
    func shouldMultiplyByTen() async {
        let expectedResult = 100
        let dummy = Dummy(value: 10)

        let actualResult = await withCheckedContinuation({ continuation in
            dummy.calculation { continuation.resume(returning: $0) }
        })


        #expect(actualResult == expectedResult)
    }
}
Here, we replaced wait(timeout:) with withCheckedContinuation, which allows us to await the result.
Now the test is bulletproof. Although your test still has a timeout (and even await has its own), the values are much larger than you might expect. If your test times out in this case, something is wrong with your CI/CD setup, and you probably need to allocate more compute resources ( Bitrise, if you’re reading this, pay up my referral share! 😎💰 ).
Case #2: Snapshot tests
If you use the swift-snapshot-tests package, you’ve probably already started thinking, ‘I can do the same thing with my snapshot test, easy!’ — but you can’t. The nature of snapshot testing doesn’t allow us to ‘await the result,’ so a simple await won’t help anymore.
In this case, we need to run snapshot tests separately and one by one to make sure that nothing else is happening on the machine while we are testing snapshots. Here’s how you can do that:
Step 1: Create a snapshot tag
In case you’re still using XCTest for snapshot testing, stop it right now. Take a bit of time to rewrite the whole thing — it’s not that difficult, and it’s worth the effort.
For those who already use Swift Testing, your test should look like this:
import Testing
import SnapshotTesting

@testable import YourApp

extension Tag {
  @Tag static var snapshots: Self
}

@MainActor
@Suite(.serialized, .tags(.snapshots))
struct ContentViewTests {

    @Test
    func contentView() {
        let view = ContentView()

        assertSnapshot(of: view, as: .image)
    }
}
Here are two important things:
- snapshots tag – it will help us run these tests separately from all other tests.
- .serialized – it forces Xcode to run tests in serial.
Now, when you run tests in Xcode, instead of running all of them, tap the snapshots tag in the sidebar, and your tests will run smoothly.
Step 2: Update your CI/CD commands
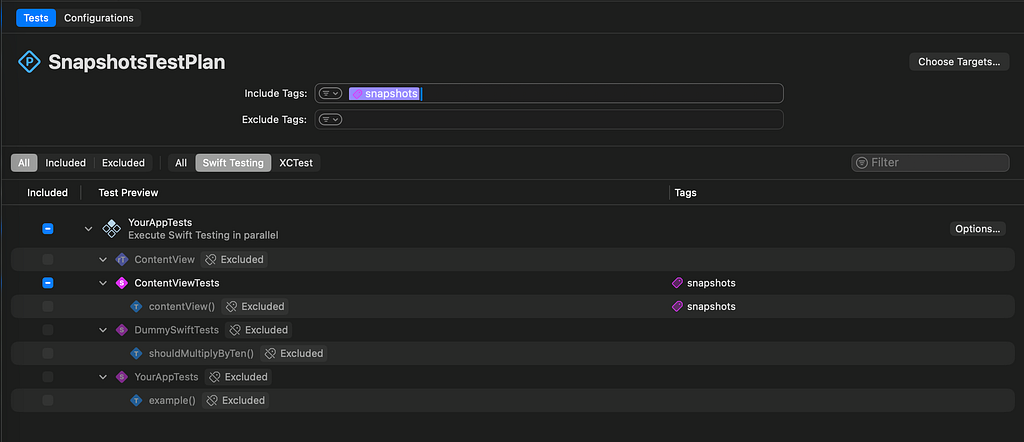
If you use xcodebuild to run your tests, you should create a separate test plan for it — let’s call it SnapshotsTestPlan. Simply create a test plan from the templates in Xcode, choose the target (it should be the unit tests in your project), select Swift Testing, and choose the snapshots tag that we created in the previous step.
You should see something like this when you click on SnapshotsTestPlan:
And don’t forget to add this test plan to your app’s scheme:
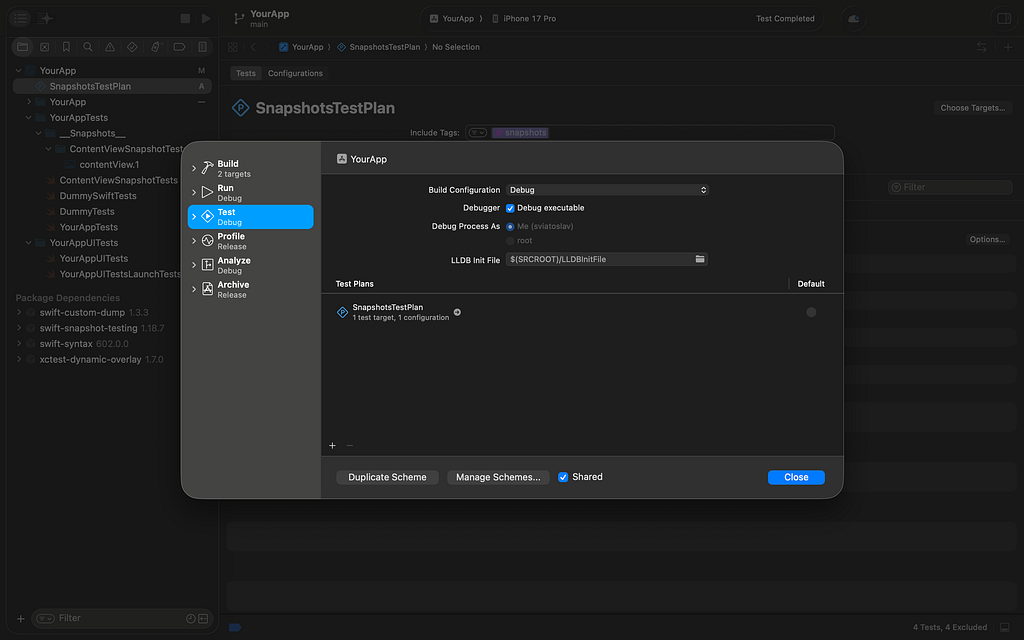
Then, when you run your xcodebuild test command, you need to add some additional parameters:
- -disable-concurrent-destination-testing — Makes xcodebuild run snapshot tests in serial.
- -testPlan “SnapshotsTestPlan” — Runs the test plan we created.
Test your setup by running this command in the terminal:
xcodebuild test \
  -scheme "YourApp" \
  -testPlan "SnapshotsTestPlan" \
  -disable-concurrent-destination-testing \
  -destination 'platform=iOS Simulator,name=iPhone 17'
*Don’t forget to replace YourApp with the name of your scheme and the destination if you use a different one for snapshot tests
Step 3: Exclude snapshots from your main test plan
Don’t forget to exclude the snapshots tag from your main test plan, or you’ll end up running snapshot tests twice — twice as long and with a higher chance of flaky tests. Nobody wants that, do they? To do so, open your main test plan and add snapshots tag to “exclude tags” field.
Case #3: Bad tests
Sometimes it has nothing to do with flaky tests; sometimes you just created a test incorrectly. Here are some recommendations on how to avoid unexpected test behavior:
- Don’t use shared dependencies — if your unit dependency is a singleton, a filesystem, or anything mutable, mock it. Sometimes in tests you end up trying to modify the same resource, which can corrupt your input. Mock everything you can to avoid using mutable, shareable dependencies. Remember: crap in, crap out. You don’t need to do this with immutable ones, though..
- Don’t write logic in your tests — the moment you start writing extensive logic in a test, you need to split it into simpler ones. In the same way you make mistakes in your units, you can make mistakes in your tests. The simpler the test, the more stable it is.
- Don’t test against the backend development stage — if your unit test involves communication with your backend API, ask your backend teammates to prepare a stable environment. It’s a pretty common situation when engineers test against an unstable development environment, and even if you agreed that interfaces are stable, if the environment is reloading, your tests will fail. Encourage your team to invest a small amount of time to prevent major issues. If you can’t do that, test against mocks or a dummy server.
Conclusions
It’s not the full set of methods that can help you avoid flaky tests. You should also consider implementing retry logic in your CI/CD pipeline, disabling external resources (such as WebViews, AsyncImages, etc.) for your snapshot tests, and many other techniques you can use to achieve reliable results. But these recommendations alone will save you a lot of time. If you found this valuable, don’t hesitate to give some claps (50 should be enough 😎👏)
Cheers!
Swift tips #3: Flaky unit tests was originally published in Stackademic on Medium, where people are continuing the conversation by highlighting and responding to this story.